
Handmade Advent Calendar
Christmas Sewing and Embroidery DIY

Merry Christmas Eve Eve! It’s almost Christmas, but I still wanted to share the advent calendar that I made. I started this project back in November, but I haven’t been able to post about it until now, which is unfortunate because advent is already over. But if you’re looking for a cozy project to work on during those chill days between Christmas and New Years, this would be a fun one to start for next year!
I had so much fun making this advent calendar, and absolutely loved how it turned out! In this post, I’ve included a step-by-step guide on how to make it, the supplies you’ll need, and a printable template. So get out your crafting supplies and let’s get to it!

1. Gather your supplies
Supplies you’ll need:
Felt
Fabric
Scissors
Embroidery thread
Needle
Measuring tape
Template (included in this post)
Thin ribbon
Command hook
Sewing machine + thread (optional, but recommended)
Small wooden dowel - 7/16 width (optional for hanging)
2. Measure and cut the pocket squares

You’ll need 25 squares to make the pockets. I chose to make mine all out of different colors of felt. I chose 12 different colors, which meant that I did 2 of each color (and one color had 3).
I’ve included a template that you can print out and use to cut the pocket squares and numbers:
3. Arrange your squares
Before you start sewing the numbers on your pockets, arrange the squares in the order you’ll want them in when finished in a 5x5 square. I went for a random pattern of colors, but you could also do a repeated pattern, the same colors together, etc.

Once you have them in the order you like, stack them in that order, with what will be number 25 on the bottom and number 1 on the top. That way, you can easily pick out your next color when working on sewing the numbers.
4. Cut the numbers
I used my template to cut out the numbers. Lightly trace them onto the felt with a pencil and cut with a sharp pair of scissors.

I chose white felt for my numbers, as well as a light pink for the ones that would be on a white backdrop.
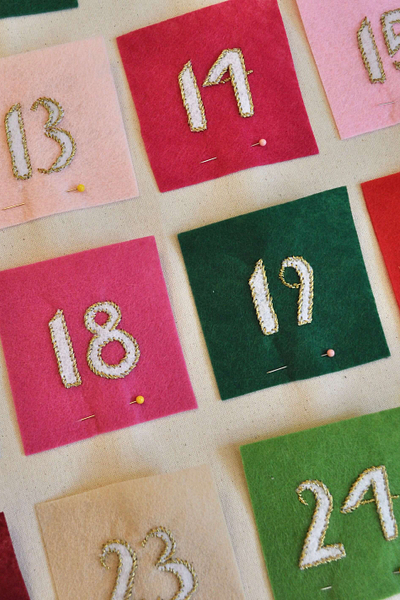
5. Sew the numbers on the pockets


Use your embroidery thread and needle to sew on all of the numbers. This is the part that takes the longest and is really enjoyable to do while cozied up on the couch with a Christmas movie.
6. Sew the pockets onto the backing

For the backing of my advent calendar, I used some tan canvas fabric that I had leftover from sewing a tote bag. Cut and measure a 23.5 x 25.5-inch rectangle. Use the rectangle in portrait orientation, so it stands tall rather than wide.
Arrange your pocket squares so that there is half an inch between them and an inch between each row (Imagine that there is more space above the pocket so that you’ll have room to take your treats out!). Pin all of the squares into place, then sew them onto the backing, remembering to leave the tops of the pockets open.

7. Sew the edges
Fold the edges of your backing in towards the back and sew them to finish the edge, which will make it look clean and finished, and won't fray.

8. Hang and fill with treats!
I used ribbon to create five loops at the top of the advent calendar. At Lowes, I was able to find a small wooden dowel, which I was able to cut to size and use for hanging. This helped the advent calendar keep its shape while hanging. I finished it off by gluing a longer loop of ribbon to the top and hanging it with a Command Strip.

You can fill your advent calendar with any thing you’d like. We chose to fill it with chocolate, and it has been one of my favorite parts of my day this month getting my little treat!


I love how this embroidered advent calendar is so sweet and personal! It almost feels nostalgic already, because I know that this is a family heirloom that we’ll be putting up every year!